

Straw Bale Gardening is here to rescue your growing season!
Have your vegetable garden experiments ended in disaster? Or does the effort involved in growing your own put you off? Straw bale gardening could be just the thing for you.
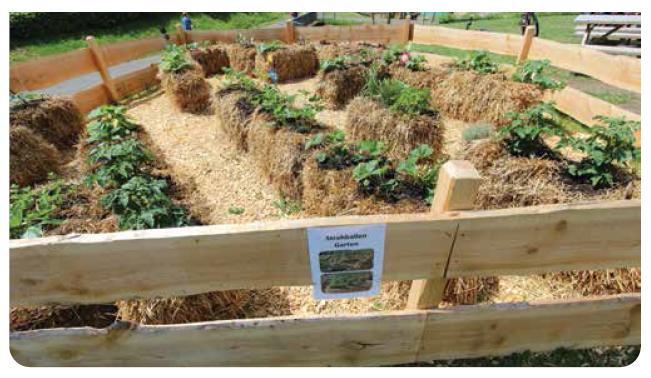
Straw bale gardening is exactly what it sounds like. You plant directly into bales of straw and let nature take its course. Think of it as a different kind of container gardening – one that has many advantages for the weary gardener.

Straw Bale Gardening Advantages
So, what makes straw bale gardening better than a regular veggie patch? Well, first of all, straw creates a great growing environment and is particularly good if you struggle with poor or degraded soil. But straw bale gardening is more than a substitute for bad soil – it’s all about maximising results while minimising effort. If you’re not a fan of the gardener’s workout – the heavy lifting, the bending down, the digging – this is perfect for you. The height of the straw eliminates the need for bending. And once you have the bales in place, there’s no heavy lifting or digging required.
Harvesting means simply knocking the bales over and collecting the goods. Weeding is easier too; there will be fewer weeds, and the ones that do grow are easily plucked out. It’s also relatively simple, flexible and cheap. You will need to invest in a few bales of straw and some fertiliser but that aside, it’s cheaper than buying containers or compost and less effort than building raised beds. It’s brilliant for small gardens. And it looks great in a quirky kind of way – the neighbours might dismiss your notions at first, but when they see the results, you’ll have the last laugh. In fact, you could say it’s the gardening method that just keeps giving because at the end of the growing season, you’ll have lovely rich compost for your flowerpots or beds. Plus, it’s disease free. What’s not to like?
GETTING STARTED
The first thing you’ll need to do is source some bales of straw. You could use hay, but straw will produce fewer weeds. An internet search will help you find a supplier easily enough, but you may have to collect it yourself as minimum orders usually apply for delivery. Make sure you position the bales where you want them before you begin the conditioning process because they are hard to move once they get wet. Also, check they are well tied; you don’t want them falling apart halfway through the season. Choose a nice sunny spot and you’re ready to begin.
CONDITIONING THE BALES
Before you plant while straw bale gardening, you will need to condition the bales. This process is vital for gardening success because it creates a warm, moist and nutrient-rich home for your seedlings. Conditioning the bales is done by adding water and fertiliser. If you prefer to use water alone, you will need to keep the bales wet for a month or so. This being Ireland, the best bet is to source your bales in January, put them in position and let the weather take care of the rest. However, you can speed up the process and create better growing conditions by adding fertiliser.
Begin by soaking the bales thoroughly, then keep adding water for the first three days so that the bales remain damp. For the next three days, sprinkle each bale with half a cup of fertiliser (or fish and bone meal) and water it in. Take care not to water too much because you don’t want to wash the fertiliser right through the bale.
During the second week, halve the amount of fertiliser you add. Towards the end of the second week, stop adding fertiliser but continue to keep the bales damp. When the straw inside the bale begins to decompose, it is conditioned and ready for planting. You will know it’s ready because the inside of the bale will feel a little warm to the touch. You are nearly at straw bale gardening expert level.
Straw Bale Gardening – Planting
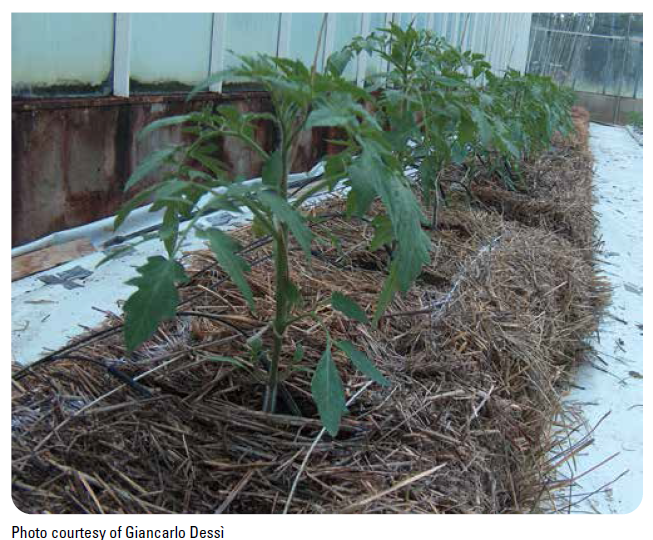
Once the bales are conditioned, you can either plant seedlings into small pockets in the straw or into holes dug out of the top of the bales. If you prefer to plant into holes, dig about four per bale and fill them with compost. If you want to sow seeds instead of seedlings, layer the top of the bale with compost and sow the seeds there. Look after the plants in the usual way by watering daily and feeding once or twice a week.
Straw bale gardening is versatile, and you can grow taller plants (like tomatoes or beans) by inserting stakes into or alongside the bales to support taller plants as they grow. Eager beavers may even be able to get an early start on their planting. The conditioning process generates heat, so frosty spring nights won’t ruin your crop – just remember to drape some plastic sheeting over the top of the bales overnight.
Like gardening stories? Then check this out.


